Guide
In-Game🔗
Start off with just following the tutorial in the top-left corner. Prior to finishing the "Unlock Basic Flight" mission, come back here.
Weapons🔗
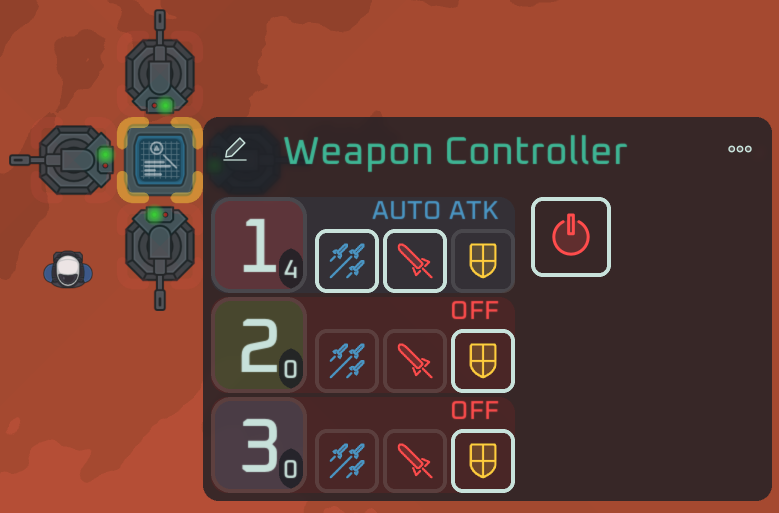
- Above you see a viable defensive structure.
- If you have pirates enabled, you want weapons unlocked before basic flight.
- Once you do, place a few Ballistic Turrets. Click on them to see their firing arc.
- Make sure the turrets remain in weapon group 1 if you want to follow these instructions exactly.
- For them to auto-fire, place a weapon controller.
- The weapon controller supports 3 weapon groups.
- For each weapon group we have the following toggles, from left to right:
- Manually select weapon group #. The number in the corner represents the number of actively loaded weapons in that group. This mode is only relevant for firing via Assign mode, or as part of direct cockpit control if set inside cockpit.
- Toggle Automatic Fire (blue rockets) - enable auto-fire for the weapons group. The following buttons dictate behavior.
- Set to Aggressive Mode (red sword) - after intercepting and destroying any incoming projectiles, actively attack any strategic targets on nearby enemy vessels. This includes cockpits, weapons, thrusters, docks.
- Set to Defensive Mode (yellow shield) - exclusively target incoming projectiles to intercept and destroy them.
- For the sake of this setup, enable Automatic Fire in Aggressive Mode for group 1. You'll know all is correct when you see AUTO ATK and a blue background.
- Troubleshooting:
- If you see MANUAL, click the first button to turn manual off for this group.
- If you see OFF, click on the blue rockets to enable automatic fire.
- If you see AUTO DEF, click on the red sword to switch to attack.
- Keeping these turrets filled with ammo is enough to keep you safe from pirates.
- Pirate attack size scales with your flight skill level.
- Pirates can attack from any direction.
Flight🔗
- You build ships by placing a "Dock" on the asteroid edge, and then a second "Dock" which will be the first block of your ship.
- It's important that there are two docks - after undocking, one will stay on the asteroid, and the other will be part of the ship.
- The minimum ship will have some hull tiles, a Dock, a Cockpit, and multiple Monojet thrusters.
- This game is governed by real physics. You need a thruster on both sides of your center of gravity to fly forward. The most basic ship would just have 8 thrusters, 2 in every corner:
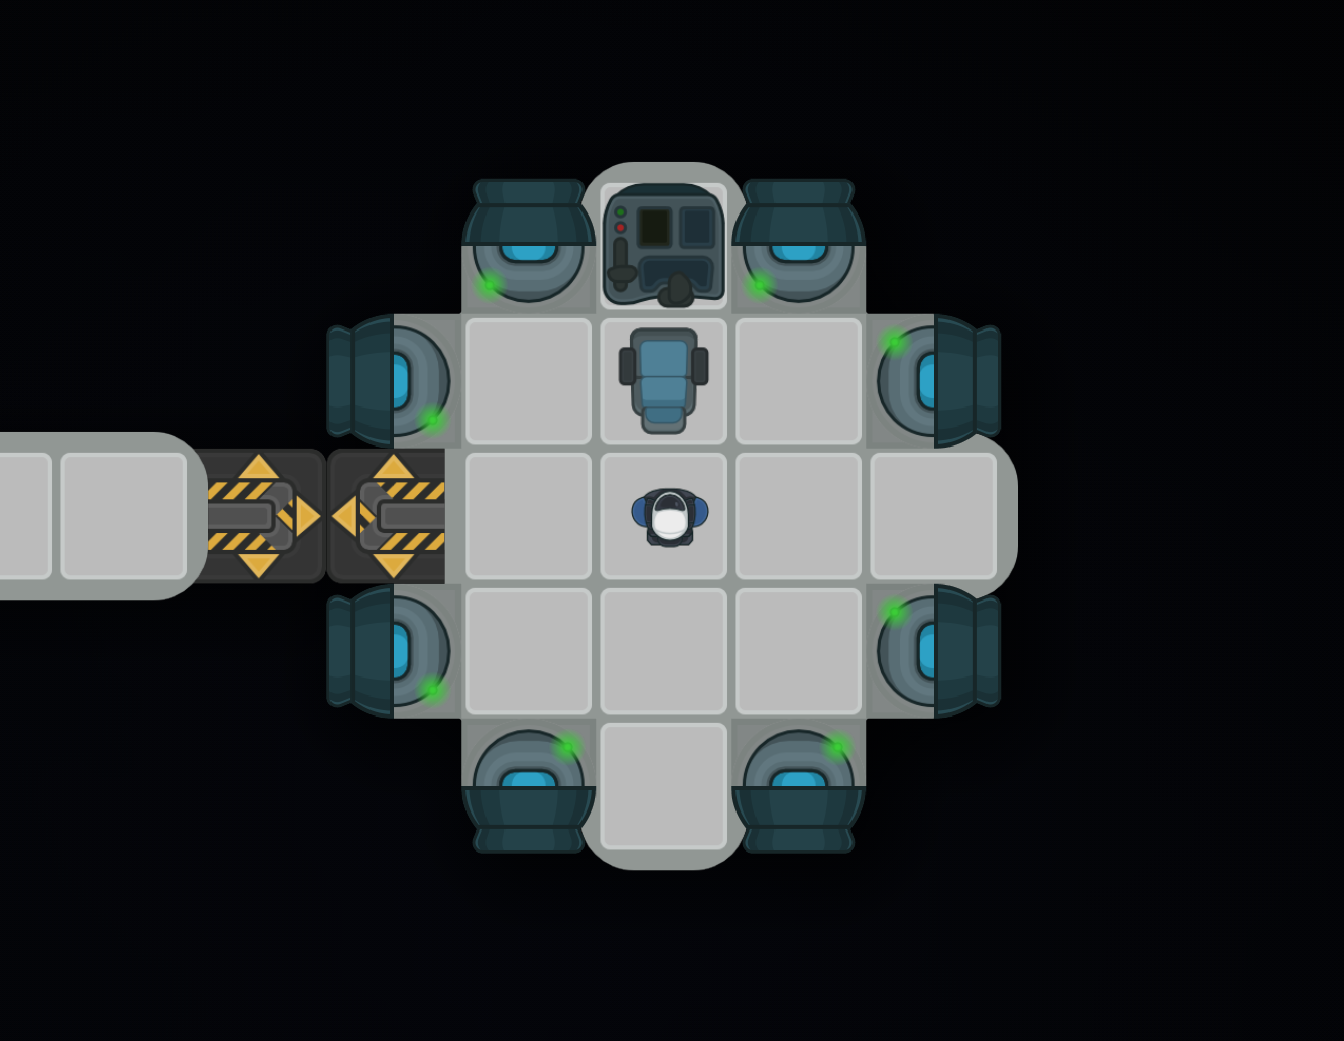
- Fill the thrusters with water, enter the cockpit with Enter, press X to undock, and use WASD + QE to strafe/rotate.
- If you change your mind, you can dock again with C
- There's a lot of buttons in the cockpit, but the key ones are
- Inertial Damping - if enabled, the ship will always try to stop motion unless given an input
- Inertial Control vs Vector Control - pressing W will send you FORWARD or send you NORTH. Basically controls being in the local reference frame or global reference frame
- If you have Pirates enabled, add a gun to defend yourself with automatic fire attack mode. If not in the cockpit, you need a weapon controller on-board to enable automatic firing.
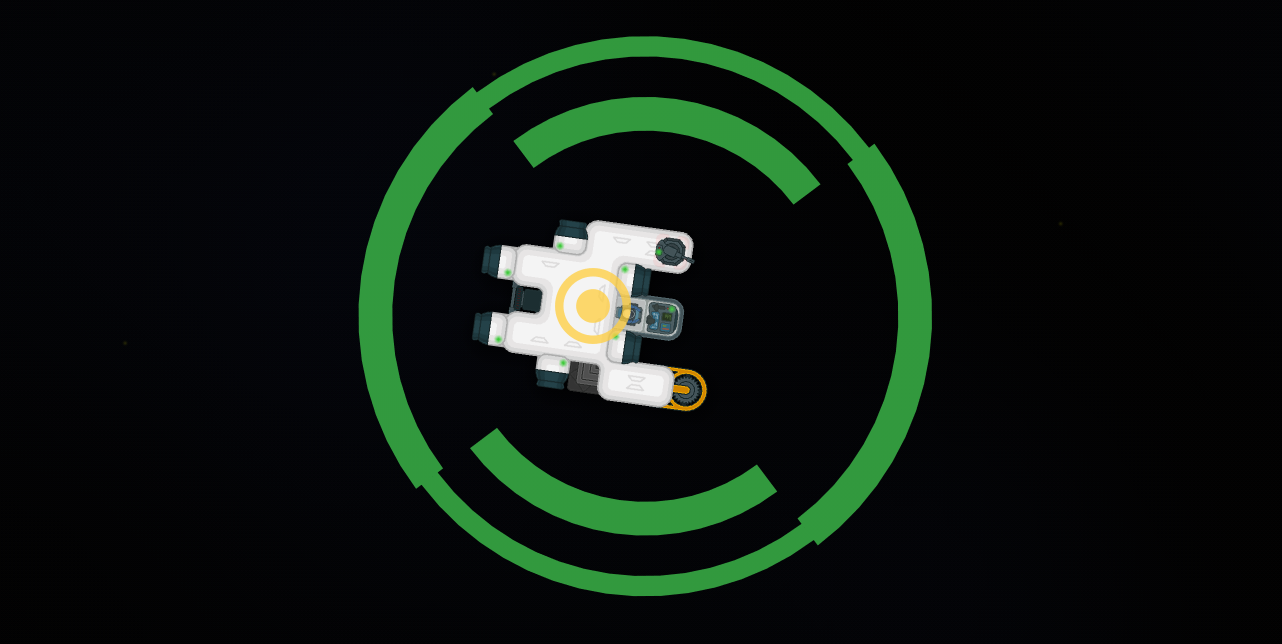
- Entering the cockpit or selecting it will show you the cockpit's ability to fly the ship.
- The outer circle represents strafing in each direction.
- The inner quarter-circles represent turning ability.
- These capabilities only demonstrate independent flight in each direction. Placing only an off-center rear thruster will still fire if you give it a "fly forward and turn" input from the cockpit, even if all the handling widget elements show red.
- Green means independent flight is possible in that direction. The thickness scales with the propulsion power.
- Red means independent flight in that direction is impossible
- Red in ALL directions could potentially mean that the ship is too heavy for your cockpit. Selecting the cockpit will show you the warning.
- You need all 6 to be green for the autopilot flight to work. Otherwise only you can fly it manually, while NPCs cannot.
- WARNING: Placing a functioning beacon on every vessel traveling through space is recommended. Every vessel needs to be either visible (through a human worker or Scanner), or marked with an active beacon. Failure to add a beacon risks your vessel despawning after 10 minutes outside of your vision.
Assign Mode🔗
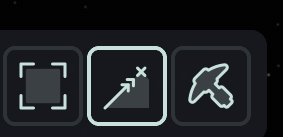
When not piloting a ship, you've noticed the "Select"/"Assign"/"Deconstruct" buttons in the bottom left. Selecting "Assign" lets you control ships like it's an RTS game.
- Walk into the cockpit - BUT DO NOT PRESS ENTER. If you see a green "Operating" above your head, you're in the right state.
- Basically, any cockpit needs a pilot. For now, you're it.
- Select the Assign mode (click it or press Z)
- The commands
- BASIC MOVEMENT: Left click your ship, and Right click where you want to go.
- DOCKING: Left click a dock on your ship, Right click the dock you want to connect to. You don't need to be nearby.
- UNDOCKING: Left click the dock on your ship to disconnect, Right click on the dock next to it.
- ATTACK: Left click your ship, Ctrl + Right click the target to attack it. If clicking on space, you will attack that point in space. Very much useless, but oh well.
- Important for ATTACK - in your cockpit, select the weapon group that you want to be the one aiming at the targeted spot. Alternatively, weapons set to Automatic Fire in Attack mode will attack based on a priority system.
Inter-Vessel Logistics🔗
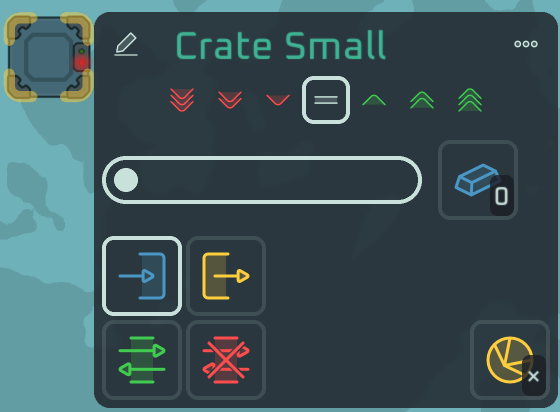
If you have vessels docked together, workers will not automatically transport resources between them. To change that, select a chest you want to use as an Export spot, and select the YELLOW button - "Export to vessels". This will now cause this chest to export to anything that wants that resource on other vessels.
The green button is Transport. It receives from yellow chests, and sends to blue chests. Basically the flow is YELLOW -> GREEN -> BLUE. If all 3 are on the same platform, the haulers prioritize carrying stuff straight to BLUE, no need to do extra steps.
That's pretty much it. Mining drills are automatic EXPORT entities, so you don't need chests on an asteroid to make it automatically export.
Copper Production🔗
Your primary aim, once you're out there flying, is setting up Copper production. Copper is available from green asteroids. Approach an asteroid, create a dock on it, and dock. Place some miners, crushers, general automation. Once you have copper set up, you're ready for the rest of the tech tree.
MAYDAY Event🔗
- Make sure you have Employment unlocked.
- Make sure you either have a bed on your ship, or two spare tiles to place a bed
- You can now fly to MAYDAY.
- In manual flight: Once there, line up your dock to the wreck's dock, and press C once the outline of "Request Attack to Vessel" turns from RED to GREEN.
- In automatic flight: Just do the DOCKING assignment.
- Left click on the human. Click "Hire".
- Left click anywhere on the wrecked ship.
- Click "Claim" to take ownership.
- You can now loot all the chests.
- Deconstruct the bed on the wreck, and create a bed on your ship.
- The NPC will walk into the new bed.
- Once undocked, they will take control of the cockpit
- KEEP IN MIND - humans need food. This wreck has plenty of rations, but that's only enough to keep one person fed for a couple hours, so create a farm!!!!
Flight Schedules🔗
If you ever played Factorio, it's train schedules. I'll cover the key details.
Before anything, give every dock or chest you want to reference a name. So:
- name the remote dock you want to attach to
- name the local dock you want to use for docking
- name any chest you want to reference, e.g.
- name the chest "Cargo" that you'll use to transport goods with this ship
- name the barrel "Fuel" that you'll use to store water you use for fuel
Then the station creation process is:
- When selecting a cockpit, click on the white clipboard icon to open the schedule.
- Add a station
- Local port - Select the dock on your ship
- Connects to - Select the dock you want to connect to
- Cross faction - keep it off for now
- Active if - you can ignore that tab for the simplest usecase.
- Depart when - add conditions that the ship will wait for before departing. IF NO CONDITIONS ARE SET, YOU DEPART IMMEDIATELY
For example:
- First station
- Connects to - name of the dock on a mining asteroid
- Depart when:
- Add Condition "Is Full" for storage "Cargo"
- Second station
- Connects to - name of your homebase dock
- Depart when:
- Add Condition "Is Empty" for storage "Cargo"
- Add Condition "Is Full" for storage "Fuel"
- make sure there's an AND between, not an OR.
- If the ship has a pilot, press Play and the pilot will enter the cockpit whenever they're needed for ship control.
More advanced options:
- Cross-faction - not relevant in singleplayer right now. However, you can enable Cross-faction, and then set "Connects to" to another faction's docks
- Active if - conditions answering the question "is there a need and desire for the ship dock to this station?". If nothing is provided, station is always active.
- Required Station - station mode that forces this station to be visited as part of the schedule. If the "Active if" condition is not fulfilled, or a suitable target location not found, the ship waits until it is active and available.
- Skippable Station - station mode that allows us to skip this station. If the "Active if" condition is not fulfilled, or a suitable target location not found, skip this station and attempt the next target.
- Repeated Station - station mode that allows us to run the same station multiple times in a row. Useful when only part of a station's task can be performed at a time (e.g. we drill out a whole asteroid rock and are forced to leave). As long as the "Active if" is fulfilled and a suitable target location is found, repeat.
For example, you have a dedicated Fuel Supply space station. Remove the Fuel condition from the second schedule station. Then you can add a skippable station with an active if "Has at most N items" for storage "Fuel", and point the "Connects to" to this dedicated fuel supplier.
If a station is NOT skippable/repeated, and has an unfulfilled Active if, this means that we will wait at the current station until that condition is fulfilled. Basically setting "Is Fuel Full" on the N-th station's "Depart when", or on the N+1-st station's "Active if", you'll have a similar outcome.
Drill Schedule Example🔗
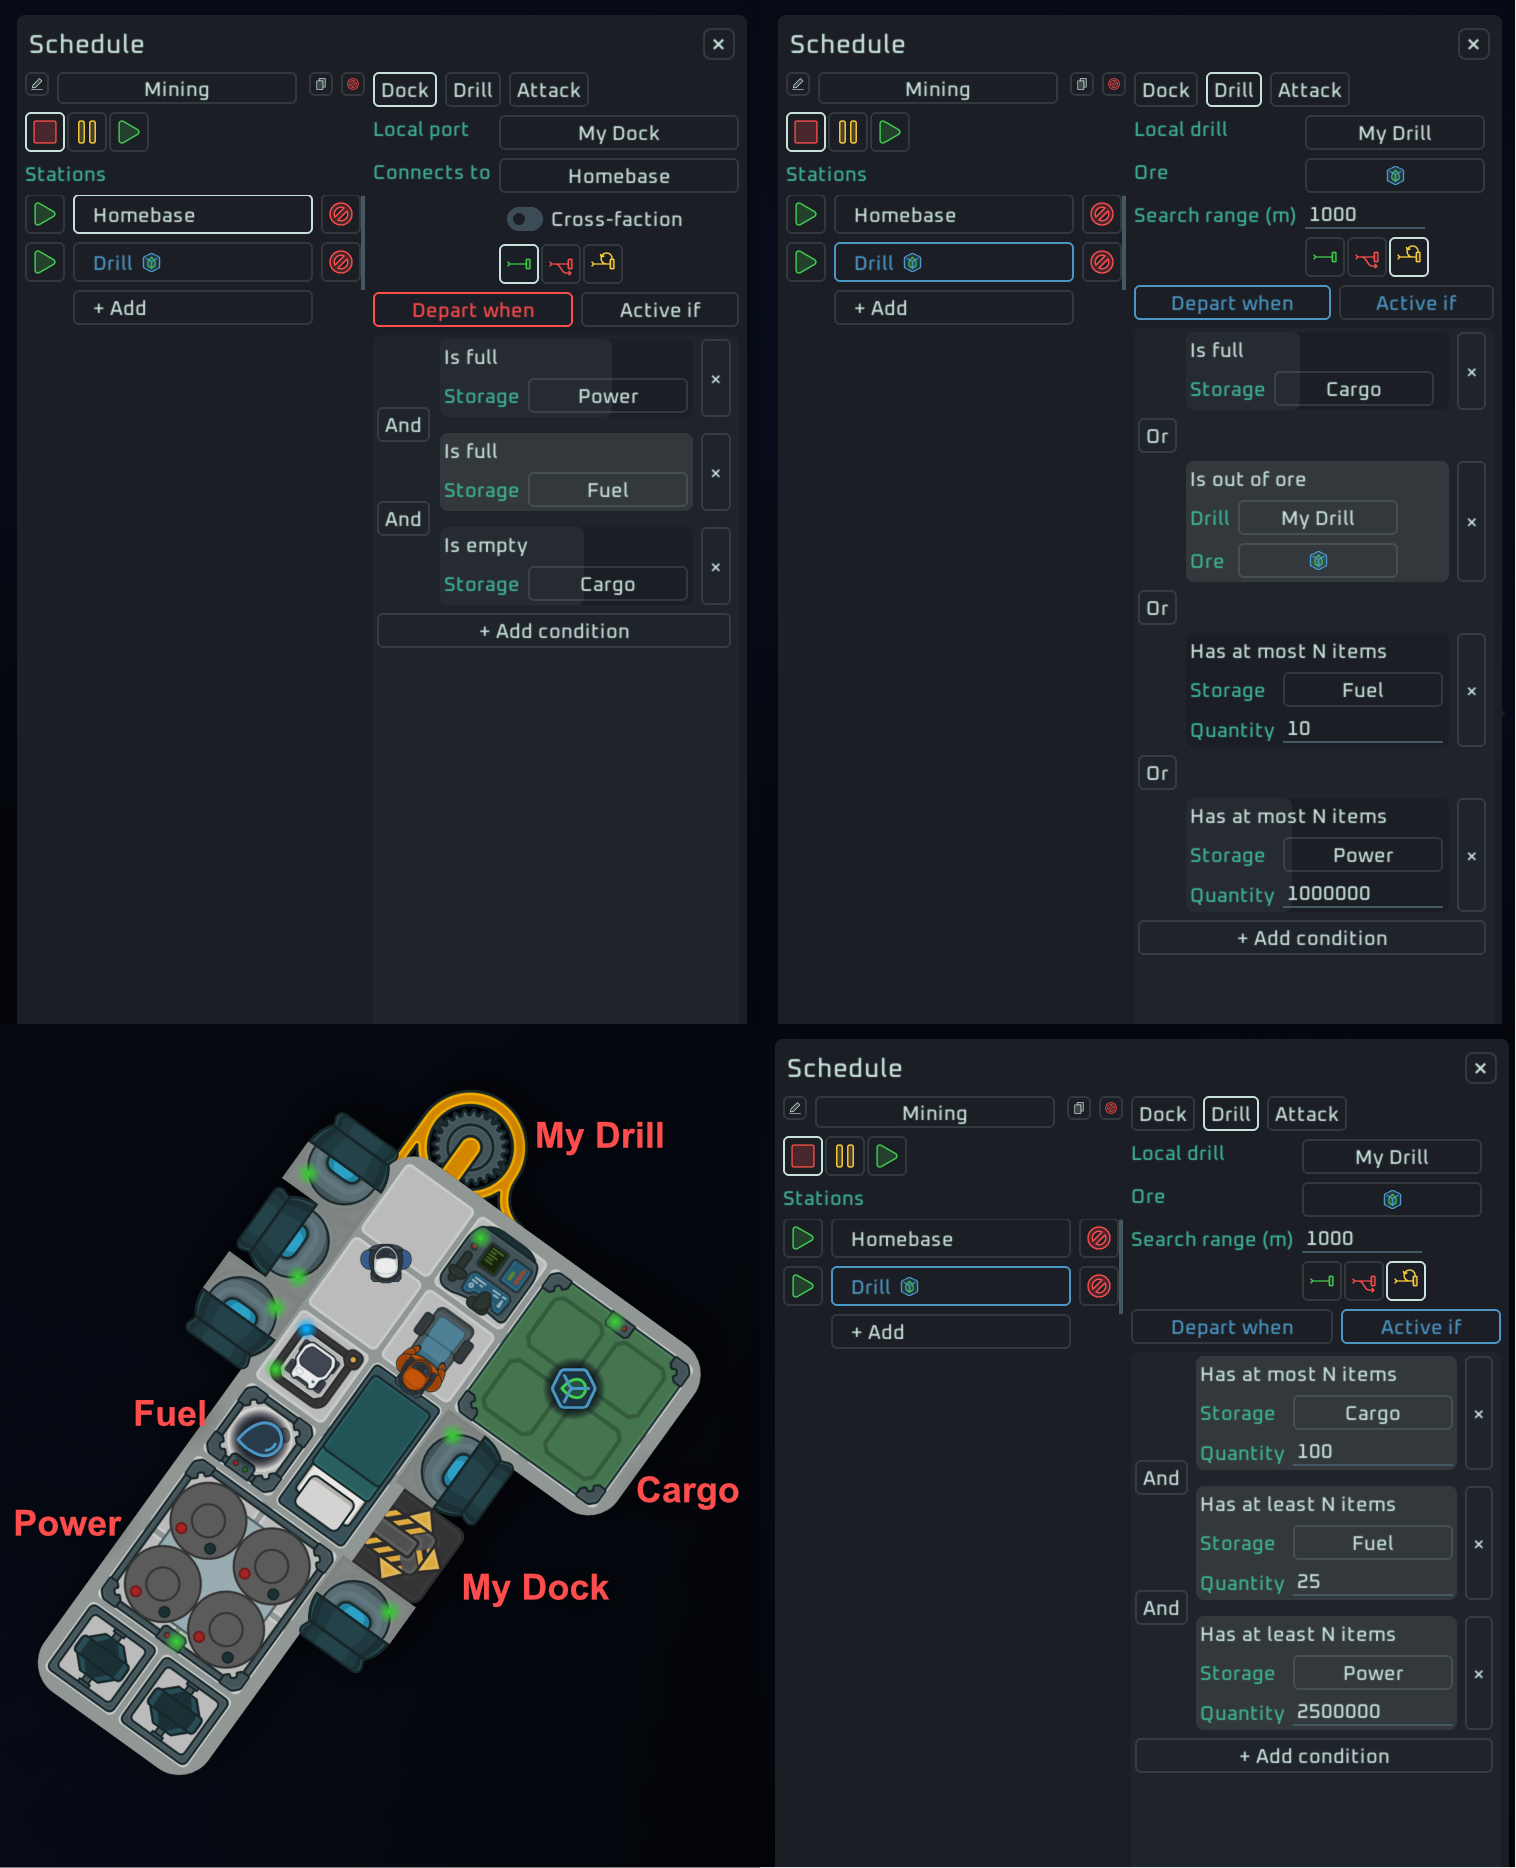
Here's an example of a complex schedule. It's a mining drone that searches for ice within a 1km range, repeatedly mines tiles until its cargo is full or it has missing supplies (e.g. fuel or battery drained), and returns home to resupply.
This is a very complex schedule. Schedules that dock from port to port one by one are trivial, and are summed up by the "Homebase Station" logic.
The image shows the names we gave to certain parts of the ship, specifically:
- Cargo - a medium crate, holding ice we gather.
- My Drill - a drill that we use to attach to asteroids.
- My Dock - a dock that we use to dock to our homebase.
- Fuel - a water barrel, used for resupplying thrusters.
- Power - a medium battery, used to power the drone and drill.
Let's go through the two stations.
Homebase Station🔗
This is a "Dock" type station - used for connecting two docks.
It specifies "My Dock" as the local port, and says that it wants to connect to a dock called "Homebase". Back at our base, we can name docks whatever we want, and reference them in schedules.
The ship will stay in the dock until:
- The battery "Power" is full, and
- The barrel "Fuel" is full, and
- The crate "Cargo" is empty
Once all three conditions are fulfilled, we prepare for the next station. Bear in mind that we do not depart until we actually find a followup station.
Drill Ice Station🔗
This is a "Drill" type station - used for attaching a drill on the ship to an asteroid tile that has the requested ore.
It specifies "My Drill" as the local drill, and says that it wants to connect to an asteroid cell that contains "Tholin-infused ice" ore, searching within a 1km range.
We mark this station as "Repeated Station" which has the effect that we will execute this station 0 or more times, and stop executing it once the "Active if" condition becomes false. This way, the mining drone will fly from tile to tile as they get mined, until it decides to return.
This station's "Depart when" condition tells the drone when to stop mining this specific tile. In the case of this schedule that happens when:
- The crate "Cargo" is full, or
- The tile we are mining with "My Drill" is out of ice, or
- We are at or below 10 Water inside the "Fuel" barrel, or
- We are at or below 1MJ of energy inside the "Power" battery
When the "Depart when" condition is met, we depart.
This station's "Active if" condition tells us whether we'll consider this station while departing a previous one.
- If the station is required, we will wait in the previous station until we're ready.
- If the station is skippable, this station will potentially be skipped if another station afterwards is approachable.
- If the station is repeated, this station will be revisited with different locations until it's no longer active, or cannot find other targets.
In our case, we did mark it as "Repeated Station". Thus, this condition is used to basically say "should we look for another matching ore tile?". The condition to do so are:
- The crate "Cargo" has at most 100 ice (full cargo is 125), and
- The barrel "Fuel" has at least 25 water (50% load), and
- The battery "Power" has at least 2.5MJ of energy (50% full)
If all these conditions are met, we will look for another ore to mine.